8.13 Light Table
NeoFinder has supported Apples QuickLook for many years, but a pro photographer needs a lot more pixel level control to cull a large amount of photos quickly.
Introducing the new Light Table in NeoFinder!
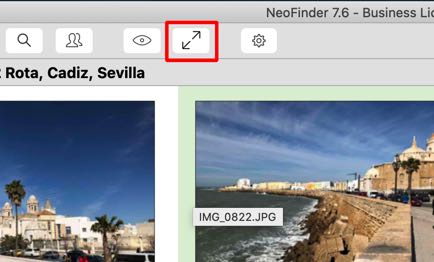
Just select any photo, and click on the new Light Table button in the toolbar of the main NeoFinder window. We have framed it in red here for you.

Or use the new Light Table command in the View menu. Or just press the + button, for magnification.
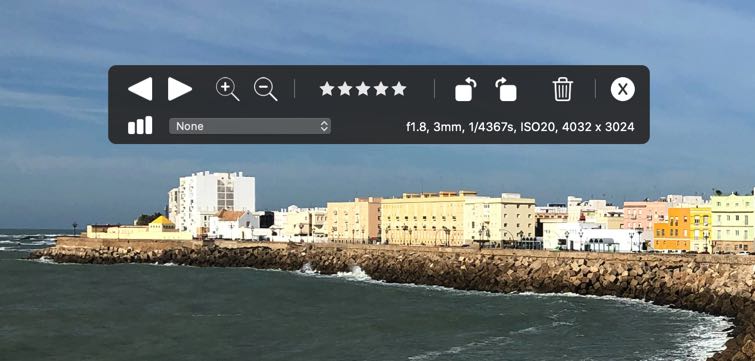
NeoFinder will quickly load the image for you, and show it in a new, almost full screen window, plus the control cockpit and the optional histogram.

You can drag the cockpit to any location on your screens, and NeoFinder will of course remember that position and use it again the next time around.
To navigate to the next or previous image, use the arrow buttons in the top left section of the cockpit.
Show me!
NeoFinder is able to zoom into on every single pixel of your photos, and then more! Just use the Plus and Minus buttons, and see for yourself.
The current magnification rate is always shown with the name of the photo file in the title of the window.

Drag it!
You can drag your image around in the windows, so you can magnify and inspect any area of the photo you are interested in.
Rate it!
The five stars next to the magnification controls are of course known to you, you have seen them in the Inspector of NeoFinder and elsewhere. Use them to rate your photos quickly.
Rotate it!
If the image has the wrong rotation, but use the next two "rotate" buttons to rotate the image clockwise or counter-clock wise. That will of course be completely lossless, no pixels harmed in that rotation.
Delete it!
If an image doesn't really meet your requirements, delete it with a click on the "Trash" button. NeoFinder will remove the image from the NeoFinder catalog, and also place it in the Trash of its volume. Along with a possibly existing XMP sidecar file.
Close It!
The last button in the top row of the cockpit, looking like an X, will close the Light Table for you.
Histogram
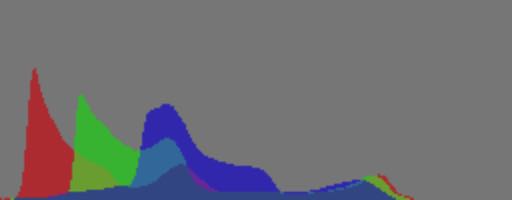
The second line of the cockpit contains a button for the Histogram, which gives you an idea of the RGB color distribution in your photo. It is shown in another separate window, which you can also drag around, and position wherever you need it.

Color Label
The Label popup allows you to quickly assign one of the 15 color labels in NeoFinder to that image.
EXIF
NeoFinder will also show you the basic most interesting EXIF photo data as well, to give you more information about the image, to help you decided if you wish to keep it or not.
Speed
NeoFinder will of course start loading the next images for you while you are looking at them, so this is generally very fast, even for large image formats.
Keyboard Control
To really speed things up a lot, most of the actions in the Light Table window can be used with the keyboard.
| + | Increase magnification |
| - | Reduce magnification |
| X | Set magnification to 100% |
| H | Toggle the Histogram |
| = | Set magnification to fit the window |
| Esc | Close the Light Table Window |
| 0 | Set the rating to 0, effectively removing the rating |
| 1-5 | Set the rating to the selected key |
| Del | Delete the current item from the NeoFinder catalog and place the file in the Trash |
| -> | Show the next item |
| <- | Show the previous item |
Online or offline?
If the actual photo file is available on any mounted disk, NeoFinder will load the original image data for you.
If a file is not available, maybe because the volume containing it is offline, NeoFinder will use the thumbnail from the NeoFinder catalog, and display that. In that case, NeoFinder will append the text " (NeoFinder)" to the file name in the title of the Light Table window.
More
8.1 Drag & Drop
8.2 NeoFinder in the Finder Services Menu
8.3 QuickLook
8.4 Roxio Toast Titanium Integration
8.5 FileMaker Pro Integration
8.6 Delete and Rename items from inside NeoFinder
8.7 NeoFinder and Tags
8.8 iCloud Drive
8.9 NeoFinder and Alfred
8.10 Notification Center
8.11 Open with...
8.12 Default Applications
8.13 Light Table
8.14 Rename multiple files
8.15 Slideshow
8.16 Save Copy as...


